By the tiswa editorial team, from the official sources listed at the end of this guide. How we write our guides
You watch a video where the instructor types a long query against an employees table that means nothing to you, and you think you followed it. Two days later you sit in front of an empty screen with no idea how to begin. That gap is normal, because watching and typing are different skills. This plan flips the order: you type from day one, on data that belongs to you.
How do you start learning SQL as a student from zero?
Start with the lightest tool. SQLite keeps a whole database in a single file, and it ships with a command-line program called sqlite3 that opens the file and runs queries directly.1 It is often preinstalled on a Mac, and on Windows you download it from the official SQLite site. If you dislike the command line, a free tool such as DB Browser for SQLite gives you a windowed view of the same file. The language is identical either way.
Before you type anything, choose a subject. The best subject for a beginner is data you already understand: your courses, their assessments and your grades, or your monthly spending, or this week’s training timetable. Write the subject as one sentence, such as: which course takes most of my hours this semester? That sentence will steer every table you create.
What does a two-week SQL study plan look like?
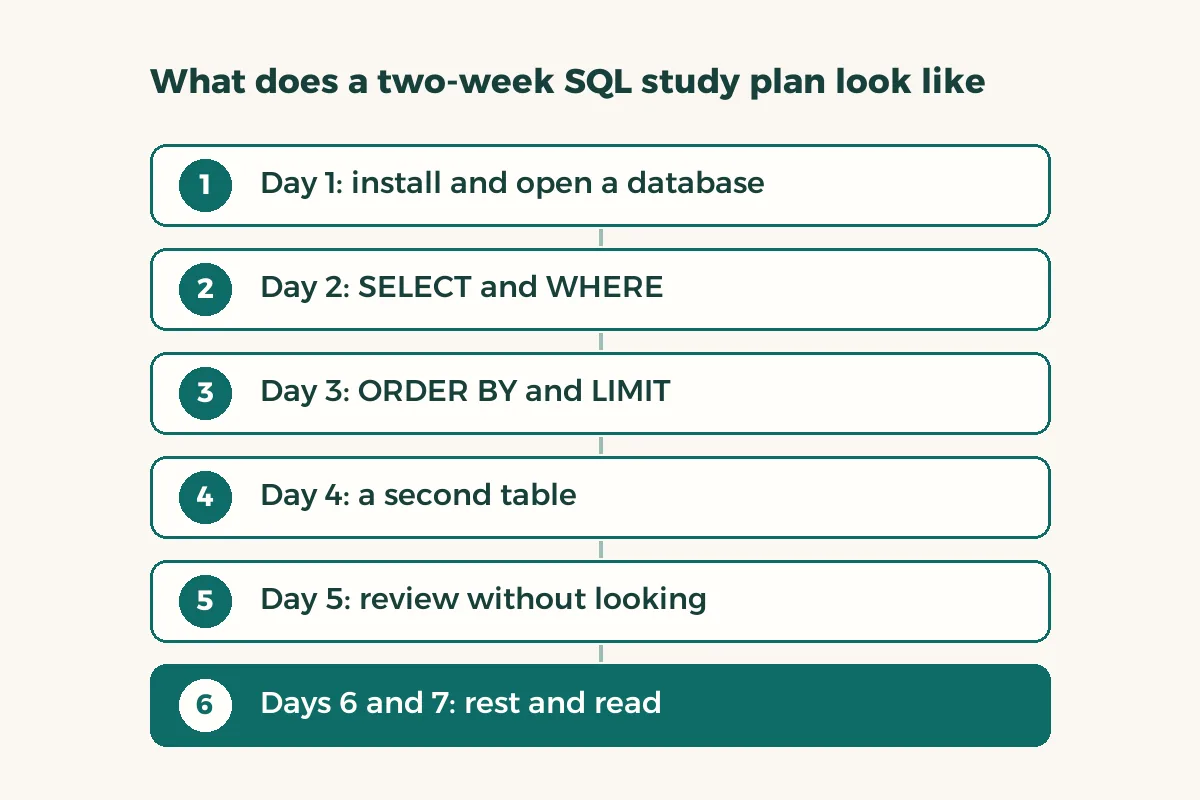
- Day 1: install and open a database
Create a file called study.db and a courses table with an id, a course name and credit hours. Insert five real courses with INSERT.
- Day 2: SELECT and WHERE
Read every row, then only the columns you need, then only courses worth more than three credits. Type each query yourself; do not paste.2
- Day 3: ORDER BY and LIMIT
Sort courses by credit hours and take the top two. Flip the order to descending and watch what changes.
- Day 4: a second table
Create an assessments table with a quiz and an assignment per course, a course_id column pointing at the course, and columns for score and weight.
- Day 5: review without looking
Rewrite the queries from days one to four from memory in a new file. What you forgot is what you revise.
- Days 6 and 7: rest and read
Read the SELECT page in the SQLite documentation and stop at anything its examples show that you did not understand.2
- Days 8 and 9: JOIN
Join courses to their assessments so each score appears beside its course name. Try INNER JOIN, then LEFT JOIN, and see which course has no assessment yet.
- Days 10 and 11: GROUP BY
Calculate the average score and the number of assessments per course, then filter the grouped result with HAVING.
- Days 12 to 14: the project
Answer three questions about your subject. Write one query for each, and one sentence explaining what the result means.
What is the first SQL query to write?
Your first query should be small enough to watch it work. Once the courses table exists and has rows, type: SELECT name, credits FROM courses WHERE credits > 3 ORDER BY credits DESC; This is an illustration, not real data. Read it as a sentence: pick the name and credits from the courses table where credits are above three, largest first. If you can say the sentence, you understand the query.
When SQLite throws an error, do not panic. The message usually names the word where it stumbled, and the usual causes are a stray comma, a missing semicolon or a misspelt column name. Read the full message before you change anything, because random guessing burns time.
How do you practise joins and grouping without ready-made data?
Build the data yourself first. Twenty rows of your real or estimated grades are enough to practise JOIN and GROUP BY, and they beat a huge table whose origin you cannot explain. If an example row is invented, label it as an example in the table name so your results do not blur together later.
When you want bigger data, the Saudi Open Data Platform publishes datasets and you can download some of them as CSV.3 Check each dataset’s terms of use and licence before you publish anything built from it. After downloading, import the file into SQLite: set the mode with .mode csv, then load it with .import followed by the file name and a table name.1
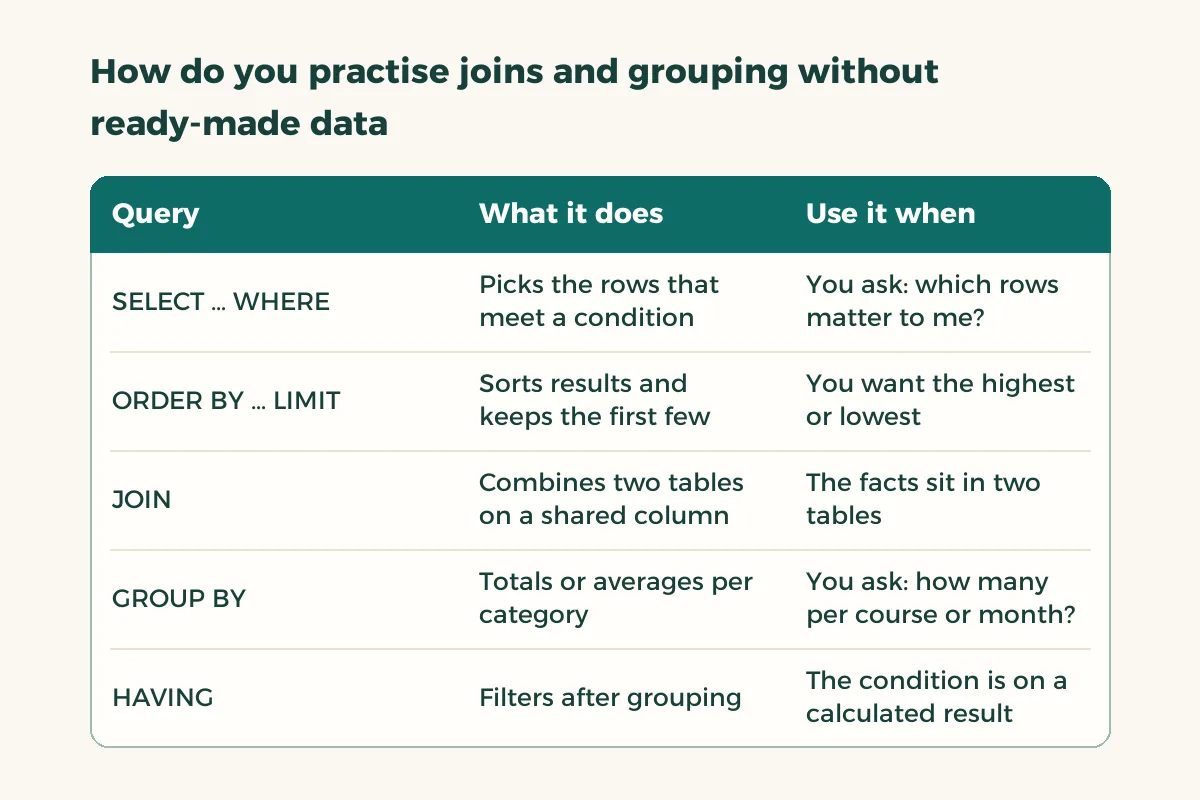
| Query | What it does | Use it when |
|---|---|---|
| SELECT … WHERE | Picks the rows that meet a condition | You ask: which rows matter to me? |
| ORDER BY … LIMIT | Sorts results and keeps the first few | You want the highest or lowest |
| JOIN | Combines two tables on a shared column | The facts sit in two tables |
| GROUP BY | Totals or averages per category | You ask: how many per course or month? |
| HAVING | Filters after grouping | The condition is on a calculated result |
How do you turn what you learned into a small data project?
A project means three questions, three queries and a one-page explanation. With the courses subject, for example: which course has my lowest average score? Which assessment carries the biggest weight and is still undone? How many credit hours am I carrying this semester? Questions that size are enough, as long as you explain each result in a sentence instead of leaving a bare table.
Keep the project in one folder: the database file, a text file of queries and the explanation. That folder is what you show a supervisor or a co-op interviewer, and it carries more weight on a resume than the phrase “I know SQL”. If you want to grow from here, the data analysis roadmap shows the next step.
Should you learn SQL or Python first?
Learn SQL first if you study accounting, business, marketing or health information management, because you will open databases before you write programs. Learn Python first if your goal is AI or automation. If you want both, give SQL three weeks, since it has few words to learn, and then move on. For deeper coverage of the core queries read learn SQL from scratch.
The courses database you built here is useful elsewhere. If you track grades in a spreadsheet today, read the Excel course grade tracker and compare the two approaches, since each suits a different amount of data.